
In a recent conversation I reflected on how I used to do drafting by hand. I have been working as a draftsman for 32 years now but I have actually been drawing plans of things since about 1975 when I was a kid. During that time I have drawn with ink, pencil, used 10 or 11 CAD programs and, I think, about 4 of these were 3D programs.
In the early years I drew plans by hand. I loved to draw plans by hand and I took great pride in it. I considered drafting by hand an art. When CAD became prevalent, I actually left drafting as I wanted to draw not push buttons. Since all my other endeavors failed, I fell back on drafting and had to go into it as I did not know what else to do.
I do not particularly like CAD, but I didn’t have a choice. What I liked about drafting was the art of it. There is not much art in CAD. All you do is push buttons and move a mouse around. I still take pride, though, in making a drawing look good and complete, even though there is no art in it.
—
As I reflected on drawing by hand, I recalled a number of interesting things about it. I wanted to record these little facts as drafting by hand may be one of those arts that will be forgotten:
The paper
The paper, or vellum, was not like other paper. It was whitish but you could see through it to some extent. For example, if you had something under it you could see enough of it to trace it. I would use this ability to trace a lot.
These papers came in individual sheets for the smaller sizes or in big rolls, 24″ wide. With the rolls I would lay it flat out on the table and measure the length needed and mark the edge with a pencil. I would then take the paper and turn it back on itself so that the sheets were flat against each other and line up the edges of the paper making sure the paper was completely flat on the other. I would take a marker, or some other similar object, and roll it along the line I made along the whole width of the paper making a sharp crease. I would then take a metal eraser shield, which has an edge that is very thin almost like a knife, and put its edge on the inside of the crease and move it outward it so it starts to rip. I then put my other hand on the paper, so it doesn’t move, and would pull the shield along the crease. Since the edge of the shield is sharp it would cut along the crease almost like a knife.
I always taped the paper to the board. Using thumbtacks made holes in the paper and the board. They also stuck up above the board and could be easily knocked off. They also get in the way.
I used a special drafting tape. It wasn’t as sticky as normal tape and didn’t leave any residue when you took it off. If you drew a drawing for a long time you often had to re-tape it because the tape wasn’t that sticky and often would start to peel off.
The drawing board
The drafting tables was covered with a rubber drawing mat. I think they are maybe about a 1/8″ thick or so. It was usually greenish in color. It was somewhat soft which helped drawing as it gave a little when you pressed down. That is to say, you weren’t drawing on something hard. If you used a compass it would make a hole in the mate but the hole made by the compass would generally close enough as if there was nothing there. If there had been enough holes in the mat it may have to be replaced as it could get rough.
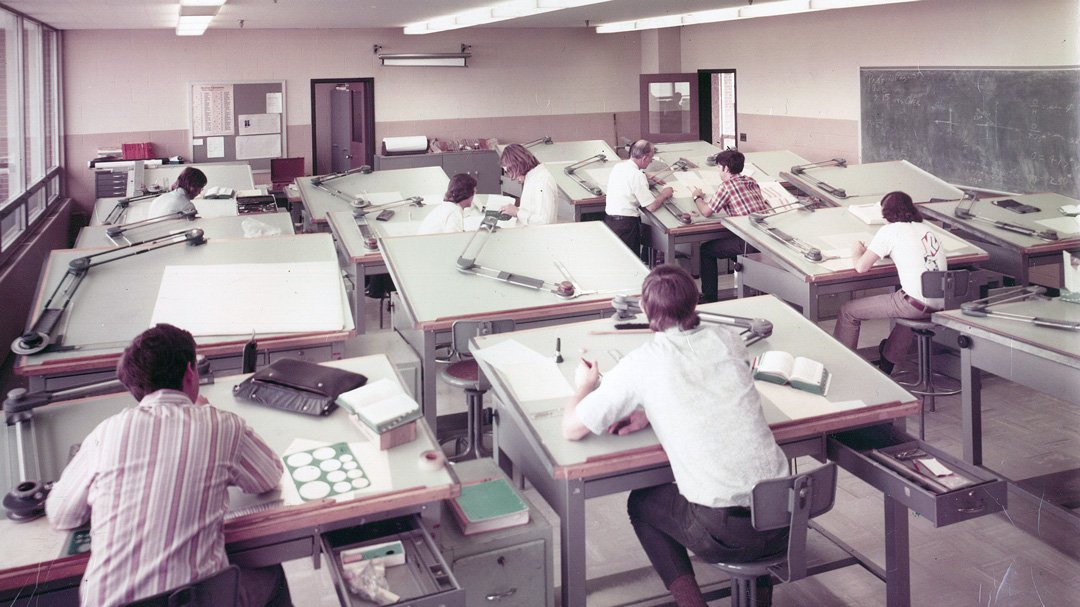
This is similar to what it looked like when I did most of my drafting by hand. They have the green mats on the tables and drafting machines.
I preferred to have a drafting table at a slight angle similar to the photo above. This allowed me to put things on the table like reference books, triangles, erasing shields, etc. I also preferred to have the table high enough that I use a stool to sit on. This allows me to stand as well as to sit. It’s nice to be able to do both, I found.
Drawing
When I drew a line I would rotate the pencil. This would keep the point sharp. It also kept a single thickness of line. If you didn’t rotate the pencil then a flat surface would appear on the lead and the line would start thin and end wide.
When I drew lines I would often press hard at the beginning and end of the line. This way, they were slightly darker at the end points. This seemed to accentuate the line and make it more pronounced with definite endpoints.
There are different grades of pencils ranging from hard to soft. If I recall right I used 4 different grades of pencils when drawing:
- Construction lines – 4H (hard – this made a grayish line that did not stand out and was so hard that it would last a long time . . . it also didn’t smear easy)
- Dimension lines and leader lines – 2H
- Object lines and hidden lines – H
- Lettering – HB (soft – this made a black line and was so soft that you had to sharpen it often . . . it smeared easily)
I tried to avoid crossing lines as it tended to confuse the drawing. For example, I avoided leader lines crossing over dimension lines.
I used a pencil sharpener to keep the pencils sharp. As a result, the pencil would get shorter as I used it. I had a special extension that you put on the end of the pencil when it got short. This made it so that you weren’t trying to draw with a stubby 2 inch pencil.
Once a drawing had been removed from the drafting board I often found it hard to realign it for drawing again. I would have to take the horizonal ruler and try to match it with a line. I would then lightly go over the line with a pencil to see if it follows the same path. If it did then I figured it was aligned. This is not as easy as it sounds.
I had a small brush and would brush the drawing often. This is because lead, and erasing, left small particles on the drawing. The lead, especially, could smear if left on the drawing.
You did not want to draw with dirty hands. Any dirt, of course, could get on the drawing and hand oil could smear the drawing and even leave a mark that you can’t get off.
Erasing
I used a special erasers to erase with. It was white and softer than most erasers. It was like a small block. There were erasers that were like pencils where the eraser is in place of the lead. I didn’t like those as the eraser seemed too hard and I found it difficult to erase with.
Since an eraser was big it would erase big areas and you couldn’t control where it would erase as a result. To erase specific areas we’d use an erasing shield which was a think metal plate with various shapes in it. You would use the shape that exposes the area to be shaped and then erase that area. The holes would only allow the exposed area to be erased.
Ways of drafting
I used several ways of drafting:
- T-square and triangle (I only used this at home)
- Parallel bars and triangle
- Drafting machines
- Sheets with guidelines (This was a sheet that has vertical lines, horizontal lines, and lines at 30 degrees that are in a greenish color, so they do not show up in a print. The lines were used as “guides” to draw with. I drew the lines with a small triangle or ruler. Because of the guidelines you didn’t need a T-square, parallel bars, or drafting machines.)

An example of a pipe spool showing a sheet with guidelines. These are often used for pipe spools which are prefabricated segments of pipe used in process piping plants such as oil refineries. These are drawn with a ruler using the lines as guides. The guidelines do not show up on the copy.
With a T-square, or parallel bars, I used a triangle to do vertical lines. I used an adjustable triangle to draw lines at any angle. You don’t need these if you use a drafting machine as you can adjust the rulers.
Smearing
One of the tricky things with drafting was smearing. The lead was often easily smeared, particularly if it was a soft lead. I carefully watched where I put everything, such as triangles, so they would not be on any part of the drawing and regularly brushed the drawing.
To help prevent smearing I only left exposed the area of the paper that I was drawing on. I covered the rest of the paper with a thin sheet of paper that came in rolls and was sort of a yellow. I bought this at an art store. It was very thin and easy to rip. It’d tear off the length I needed and tape it to the drafting board. With a large drawing you would have to use several sheets. I even covered areas that had no drawing. This is because lead on the palm of your hand or drafting machine could still make smudges.
If you knew what you were going to draw it was best to try to start on the upper right and work toward the lower left. This is if you are right-handed. This helped prevent smudging by making it so that you are not working over any part of the drawing with the drafting machine or rulers. This is because the horizontal ruler was always below the drawing and the left hand and vertical ruler was on the left. These made it so that the left and lower area were always covered by something and would leave the area to the upper right exposed for the drawing (see photo below).
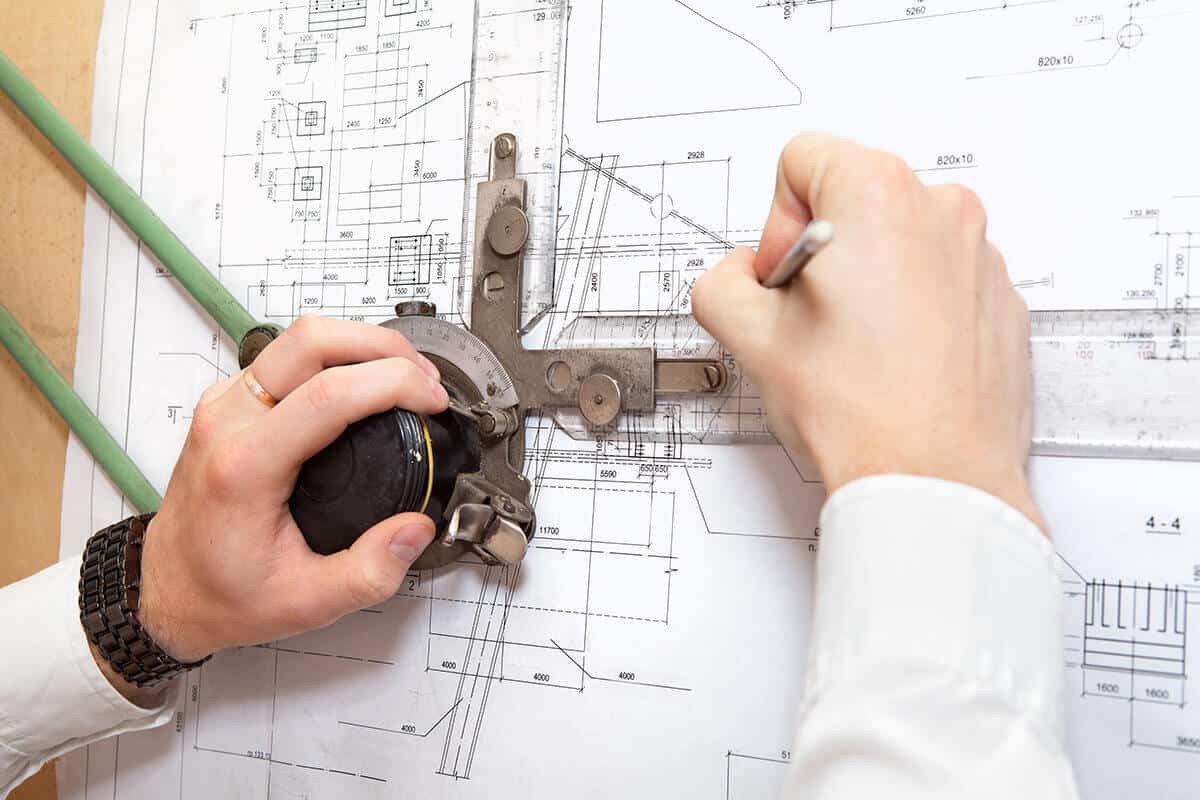
Using a drafting machine. The area to the upper right is open to draw with. In this case, I would of covered the whole left and bottom sides with paper to prevent smearing.
Lines
I used different thicknesses for the lines:
- Border – These are the thickest. I often liked to do these in ink to prevent smearing by using a mechanical pen set my dad gave me. These could be as thick as about 1/8″ or so.
- Object lines – These could be almost 1/32″ thick and often took several passes with the pencil. I also pressed harder to make it dark.
- Hidden lines – These were a thickness in between the object and dimension lines.
- Dimension lines – These were thin and narrow.
- Construction lines – These were drawn so lightly you often could barely see them. I often erased them later if they were noticeable.
The idea is that when you look at the drawing the object is easily delineated amongst all the lines by their thickness. If the lines are all the same thickness, then it can becomes hard to tell where the object is. It becomes lost in all the lines.
In architectural drafting you made the lines extend beyond where the lines connect. This has become almost traditional. I was told that this is because house plans are used outside by the contractor and the sun would fade the print causing the lines to shorten after a while. When the lines were initially drawn longer then the lines looked “proper” for a longer period of time.
In architectural drawing I would often would use a blue colored pencil and shade the walls slightly on the back of the paper. This would give a light shade when copied. I put it on the back so that, if I had to erase anything on the face of the drawing it would not affect the shading.
Once the walls of a house had been determined I would trace it on the back side of the paper for the mechanical drawings, plumbing drawings, etc. This is so that if I made a mistake I could erase it and it would not affect the wall. I also did it in ink as if you did it in pencil the lead would remain on the table if you erased in that area. As you lifted the paper off the table you’d see lines on the drawing board where you erased. This would also reduce the line density in that area.
Compass
I hated to use the compass. They made a hole in the paper. It was also hard to make the lines look good. Object lines were particularly hard to draw because they were thicker and also had to be dark. To make the thicker line I had to draw the circle and then slightly adjust the diameter of the compass and do it again to create the added width. As a result, I often had to go around multiple times. This often made the hole bigger. Sometimes I had to press the lead into the paper as I worked the compass around to make the line dark. As much as possible, I tried to use a circle template.
Preparation for drawing
I often liked to do a quick sketch of what I needed to draw on a sketch pad before I started. I would put in the object and estimate the dimension line locations and any notes. This way, I could plan where everything would go and plan how it was going to look. I didn’t just “start drawing” but had, in my mind, an image of what it was going to look like before I started. I would then measure the space and figure where the drawing should go in that space. Lets just say I’m doing a building that is 100′ wide and, if I measure the available space with the same scale, it comes out as 180′ from border to border. This means I need to measure 40′ from the border to start the building wall to a make it centered in the space. If I figured there was going to be more dimensions on that side then I would make the dimension more, say 50′.
Lettering
I spent a lot of time practicing lettering. When I was in Jr. High I used to do calligraphy and that helped me a lot. I still love to letter. I think that a draftsman should enjoy lettering. Many draftsman neglected it as they were more interested in drawing the part. As a result, they don’t get good at it. Good lettering plays a major role in making a drawing look good. Lettering that was consistent, and looked the same over the whole drawing, also “unified” the drawing making it look like one piece.
I often had different ways of lettering depending on how it was being used. Changing the lettering showed its importance or made it stand out for some reason. I did it in ways such as:
- The size of the lettering
- Underlining
- Italics
- Using upper and lowercase lettering
To me, the most important lettering is the name of the drawing, such as “PLAN VIEW” or “ELEVATION A-A”. As a result, it was the largest lettering and I liked to underline it . I’ve also done them in italics and upper and lowercase lettering to make them stand out. Any important note or statement was often underlined to make it stand out.
Some people liked to use a lettering template. This was like a piece of plastic with holes in the shape of letters. All you did is put the pencil in the letter you wanted and trace along the holes. I did not like these as the lettering looked “artificial” and I also took pride in lettering.
Lettering for architectural drafting tends to be more artistic and this has become almost traditional. In most other forms of drafting the lettering is more standard or “block”-like, usually with all capital letters.
Copying
I only copied the drawing using what we called “blue line”. A “blueprint” is when the plan is blue with white lines. I never used that. I believe that ceased to be used in the 1950’s. With the “blue line” the paper remained whitish with purple/bluish lines. In this way, it resembled the drawing only with purple/bluish lines.

A “blueprint” from the 1930’s, I believe
To print the “blue line” I put the original on top of the copy paper. The side of the copy paper where the print will be located was coated with a yellow chemical. I then put the short ends in the copier which had a roller. I would let the roller take the ends and draw the paper in. I’d then hold the other ends of the paper and make sure it goes in properly. As the roller turned the paper was pulled through. As the papers began to come out of the roller I would take the two papers and I would separate them, one hand for one sheet and the other hand for the other sheet. I would then pull them slightly so there was an even tension on the paper coming out of the roller. This is to avoid the papers slipping as it could crease the paper and, of course, ruin the print. I also didn’t want to pull too hard as it would pull the paper through the rollers. It was often funny doing this with a 24 x 36 sheet as I would be standing 4 or 5 feet from the machine holding both papers in my hands as they came out. As the drawing went through the roller there was a light that shined on the original drawing casting a shadow of the drawing on the copy paper. The places covered by the lines would remain yellow on the copy paper. The rest would turn white. I’m not sure how but it somehow used ammonia to change the chemical from yellow to a purplish blue so that when it came out you had a purple/blue line copy of the original. There was a tube going from the machine to a jar of ammonia and there was a smell of ammonia.
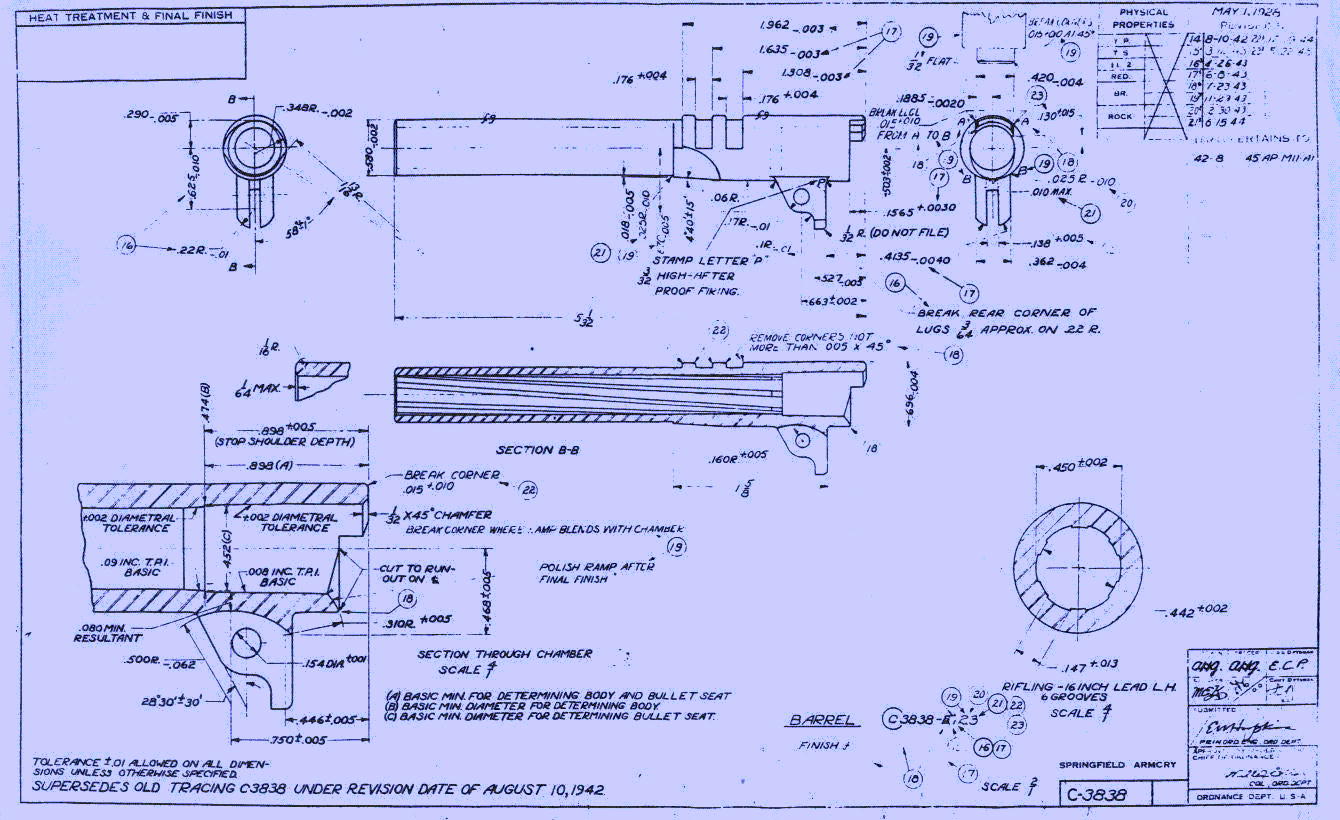
A “blueline” from 1942
The finished drawing
I treated the originals like holy relics. This is because they are original and there’s only one and, in many cases, there was a lot of work in it. I would grab them by the ends avoiding touching the drawing itself. It was best to store them flat, in a drawer or hanging as rolling the original sheets might smear them. A couple of times I used a special spray that you spray on the finished drawing to help prevent smearing. It was like a coating on the drawing. It did seem to work to some extent, if I recall right.
Inking
I don’t ever recall using ink at work but I used to play around with it at home and used them at school. I had a special mechanical pen set. There may of been something like 5 pens. Each could make a different thickness of line. Often, you would have to put the tip of the pen in this small basin of cleaning fluid which had a vibrator. This is because the ink would often dry and make the plunger in the tip unmovable which means that it wouldn’t work. The fluid and vibrator helped to break up the dried ink and loosen the plunger.
If I made a mistake with the pen I would use an X-ACTO knife to scrape off the ink from the paper. If you weren’t careful it would scrap off the top layer of the paper so I had to be careful. Another problem is that once the ink was scarped off it left a slightly rough surface which can make it hard to draw a line. The rough surface will make the lines “bleed” all around it creating something like a blob. If you scarped too much you could put a hole in the paper.
If you used a template, such as a circle template, while inking you had to make sure you had a special type of template. It had to have “dimples” or bumps on the underside. This raised the template above the paper. The reason for this is that if the template was on the paper the ink would tend to run under the template as you inked and spread out underneath the template. This would ruin the drawing.
Mylar
I have also drawn on mylar which is like a sheet of plastic. I used special plastic-like pencils to draw with. I used to jokingly say that I was “drawing with plastic”. Drawing on mylar created really nice, dark, and sharp lines. When you pulled the pencil across the sheet it was incredibly smooth whereas drawing with lead on vellum was somewhat rough. Its smoothness made lettering nice to do. I recall that erasing was a problem. If you erased too much it seemed it would deform the sheet. Also, it seems that if you pushed too hard when you drew it would deform the sheet. Once it was deformed it remained deformed. One effect of this is that any line drawn through this deformity will not be straight. As a result, I had to be careful. I liked drawing on mylar but didn’t have much opportunity to do it.
Drafting standards
Contrary to what one may think there is really no standard for drafting technique. There are basic guidelines or rules, but nothing is definite. When I was in school a man said that “the guidelines you use are determined by the company”. That is the case. But even that isn’t solid as I’ve worked for companies that say that we should dimensions things this way and then, 3years later, say to do it another way and then, 2 years later, go back to what it was. There’s also a lot of difference of opinion with different people. One will say to do it one way. Another will say to do it another way. This sometimes created uncertainties on how to do things.
The best drafting technique
If someone were to ask me, whose done hand drafting to 3D, what is the best way to do drafting I would say that it would depend on what you’re doing. There’s advantages and disadvantages to all of them and the needs of the situation dictate what should be used.
For general overall drafting I think drafting by hand or AutoCAD is the best. I often think that drafting by hand is still an effective way of drawing, in many cases, but no one will give it a chance anymore (its not “advanced” enough).
The primary advantages of AutoCAD over manual drafting seems to be:
- Things can be moved in its entirety. That is to say, one can move a whole object, or drawing, quite easily. You don’t have to redraw it.
- Things can be copied easily. In this way, it is easy to duplicate things.
- You can use things that have already been drawn so you don’t have to redraw them.
- Its often easy to change existing objects and drawings.
In many cases, these qualities make AutoCAD better than drawing by hand. But if you had to draw everything in AutoCAD, line by line, it would probably be easier and quicker to do it by hand. It seems that the main advantage of AutoCAD is that you can draw something once and reuse it again and again. In this way, its like taking existing drawings and objects and assembling them in a drawing.
In my job now I draw assembly lines with AutoCAD. Because I am using existing equipment, such as product bins and conveyors, AutoCAD is the best thing to use. Its easy and quick to copy and paste, duplicate, move things, and such. This is particularly important as I often have to do many concepts. Its also easy and quick to change things. This is particularly important as I often have time constraints and often have to do a drawing in a matter of minutes. I think that, for what I do, AutoCAD is the best tool. It supplies what I call the “Big Three”:
- Its quick
- Its easy
- Its versatile
In a business environment these are the things you need. To me, these are so important that, to sacrifice any of these, you better have a good reason for it.
But there are many reasons to sacrifice the “Big Three”. Some examples include:
- “Specialized programs”, designed for specific functions, can offer many other advantages.
- Some fields require more elaborate and detailed drafting such as a turbine engine.
- Some fields use the drafting program in conjunction with other programs.
The problem is that many companies are willing to sacrifice the “Big Three” for nonsensical and ridiculous things such as these:
- The illusion of “specialized programs” – There are many “specialized programs” designed for specific functions. Though they may seem best this is not necessarily the case. I’ve seen some “specialized programs” that actually makes things worse or in which there is no real benefit. I recall an incident where we who were drafting by hand could not only outdraw the guys with “specialized programs” but could make alterations much easier by hand drawing. Despite this the company seemed to think we should use the “specialized program”.
- Being “impressed with technology” – I think that some drafting techniques are used because they “impress” not because they are practical, efficient, or needed. 3D drafting is one of these. I think it’s being overused and is overrated. I can see its value in some situations and fields, but I don’t think it’s really necessary in most fields. Its main value, it seems to me, is that it makes people” impressed with technology”. To me, 3D takes too much time and effort to do, and, in many cases, you really don’t gain much by it. So far, I have outdrawn the 3D guys with AutoCAD and the end result is the same . . . it gets built. A good example is how we needed a piece of equipment changed on a drawing. The 3D guys didn’t want to do it as it would take a long time to do. I made the change in AutoCAD in less than a minute. And, yet the company thinks 3D is the way to go!
- The myth of progress. Many companies believe that anything viewed as “progress” is automatically good. They will adopt any new program or technological gadgetry believing it is going to be beneficial even though it may do nothing at all or even be counterproductive.
- The fear of getting behind. Many companies, I think, will adopt programs and technology for fear that they will get behind everyone else. And so, they will start using a program or system that actually offers them nothing and may not be beneficial . . . all out of fear. As it appears to me, fear plays a big role in what many companies do. I think this is a lot more prevalent than it may seem.
- The stupid opinions or points of view of management. As I’m sure we all know, management tends to have weird points of view and is often disconnected with the reality of things. This often translates to unwise decisions. In many cases, they will use what impresses more than what is effective, needed, or useful.
Many companies, I think, have lost a practicality because of things such as these. Personally, I think this is a problem nowadays. I say this because, from my observation, a lot of things in the engineering field are not necessarily being done because its needed or practical or efficient. The engineers just convince themselves that it is. (See my article Thoughts on the loss of practicality to the “myth of advancement”).
What one uses, and how one uses it, is something that has to be at looked at closely by a company. But it seems to me, that this has to be looked at practically and wisely. There are many ways of doing things now. Sometimes, drafting by hand is better, sometimes AutoCAD, sometimes 3D, sometimes “specialized programs”. It all depends on the situation.
Copyright by Mike Michelsen
